DIY Newspaper Scanner
Published under Engineering, Hacking, Photography.
In 2015, one year after the celebration of the 100 years of printed journalism in the province of Pacasmayo, we took on the challenge of digitizing the entire newspaper archive stored at UNDiario. This digitization would be achieved with a DIY scanner made of two hacked cameras, 2x4 wooden beams, and a basic script.
In this collaboration, I worked with my brother, Luis, an engineer graduated from the National University of Engineering (UNI, Peru), and my brother in law, Elias, Journalist and the General Manager at Últimas Noticias Diario. All avid DIY-ers.
A Bit of History
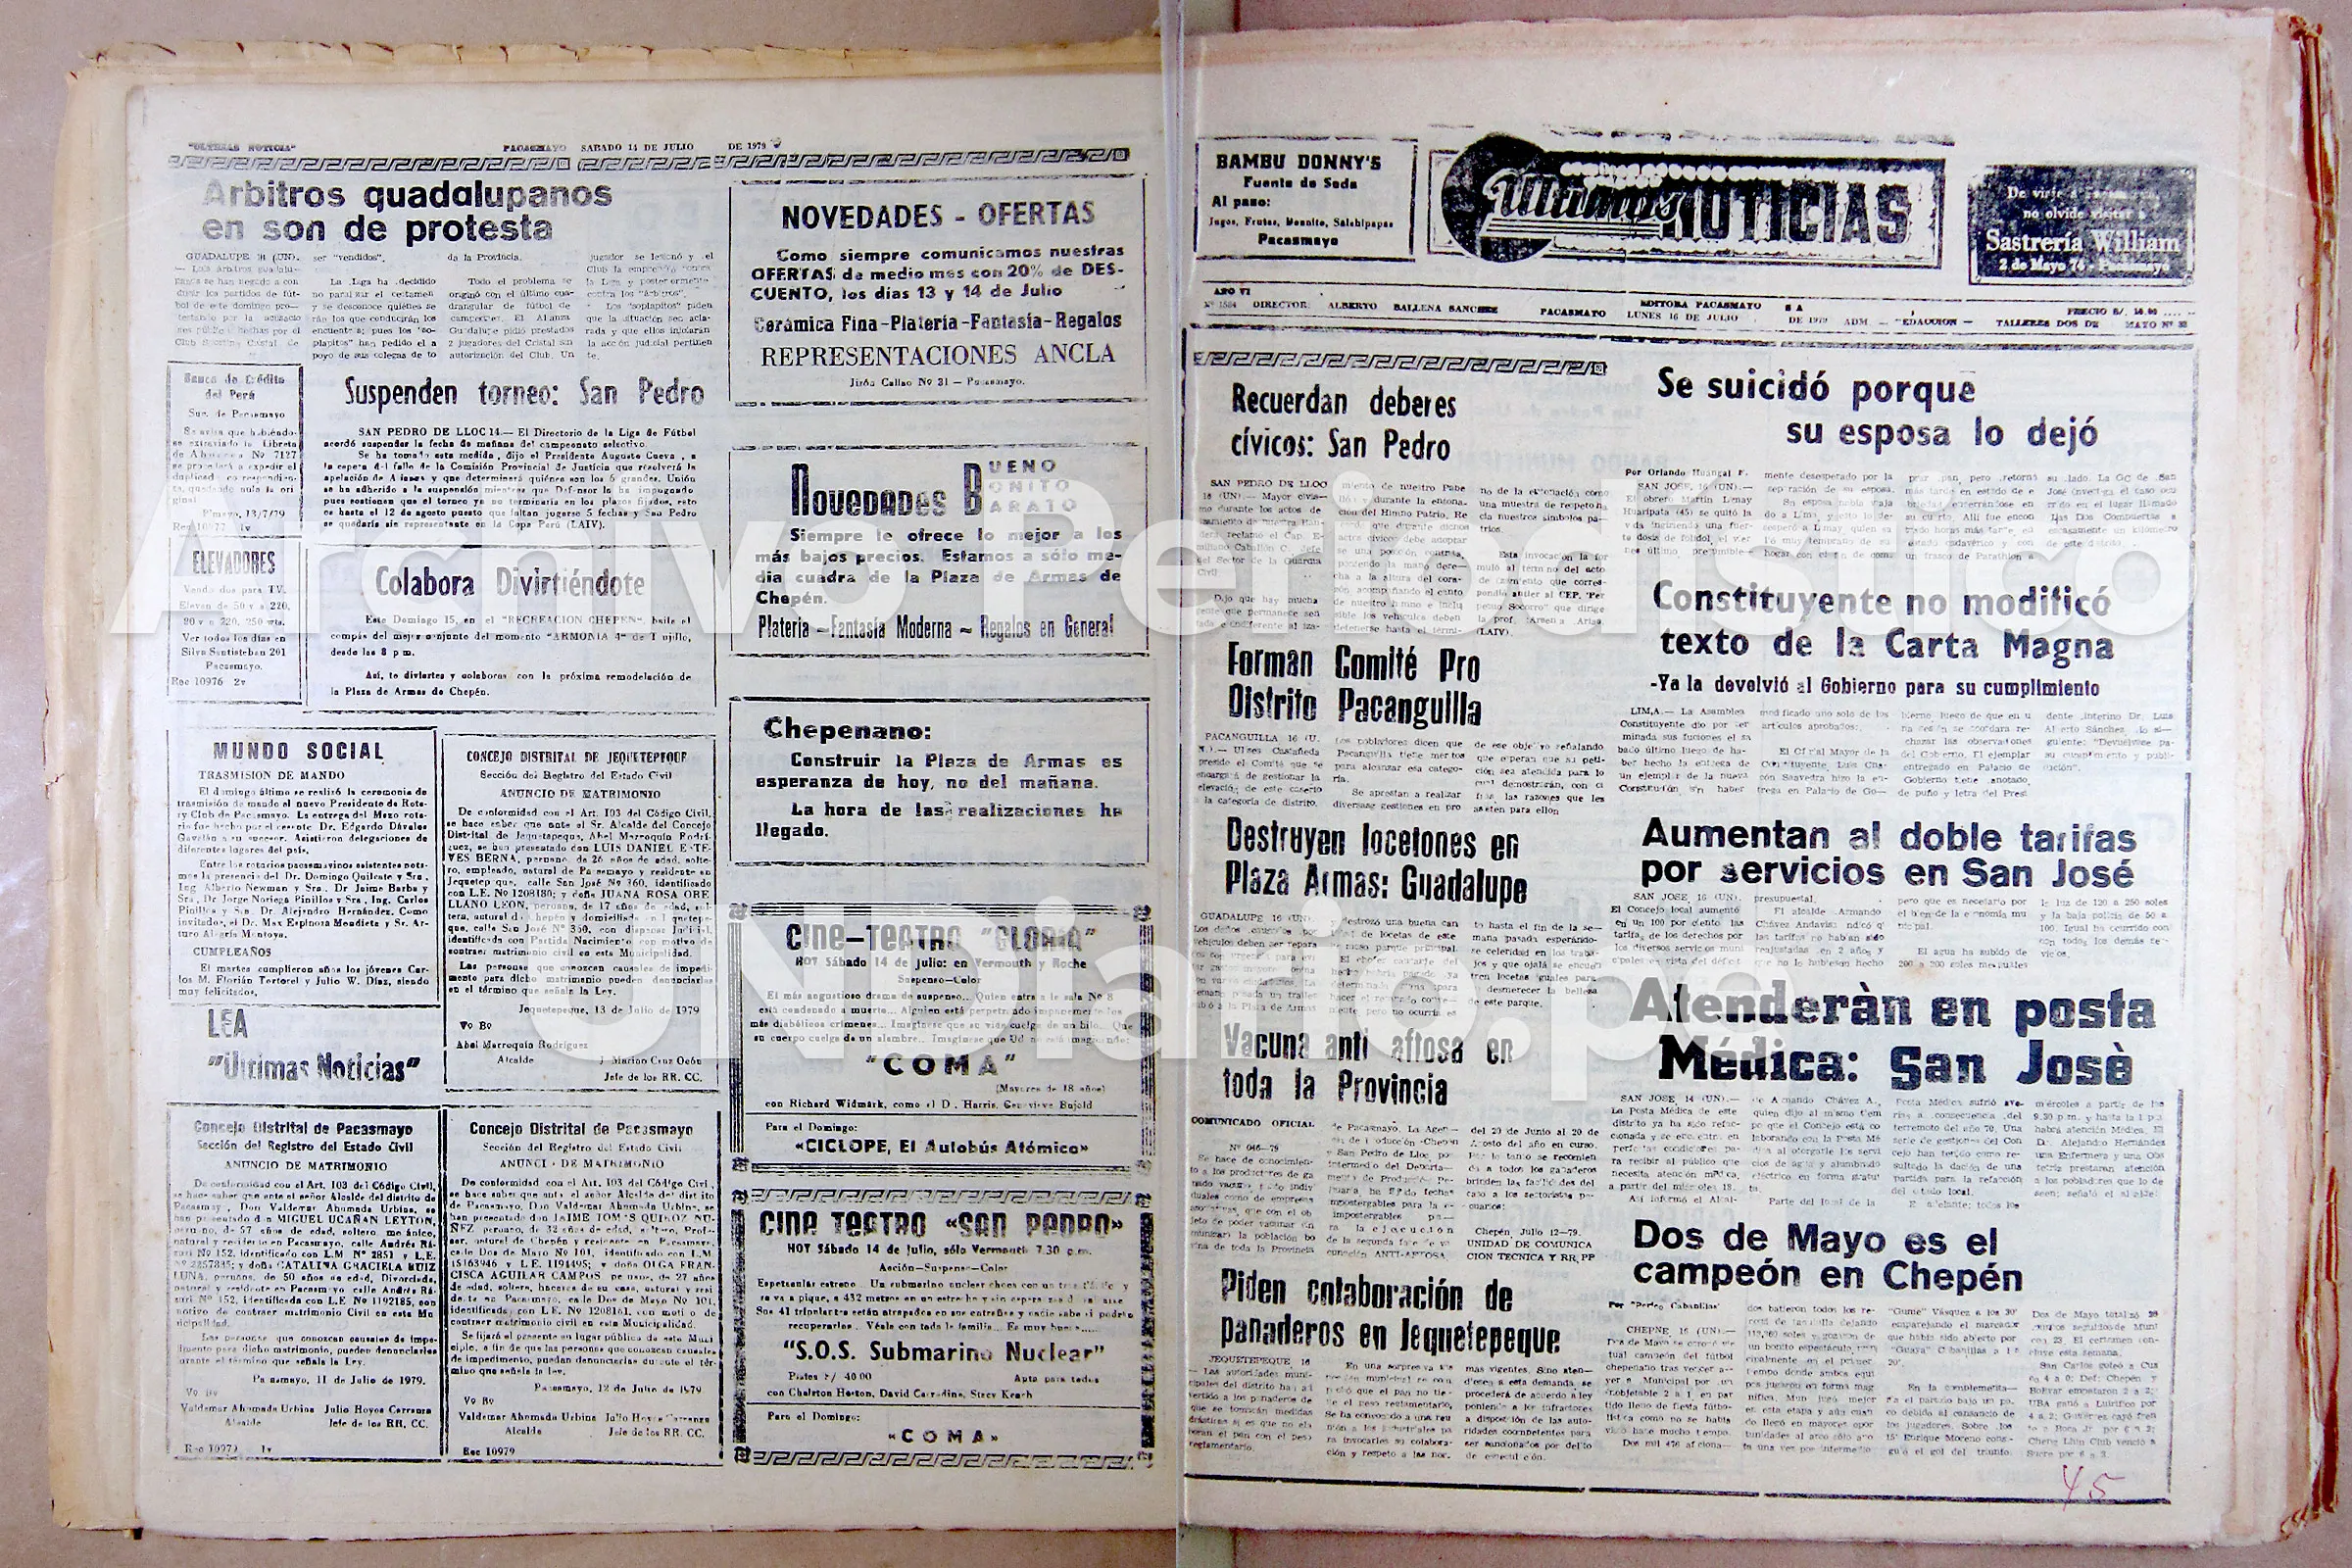
Últimas Noticias Diario (@UNDiario) is a hyperlocal newspaper located in the province of Pacasmayo in the northern coast of Peru and it serves primarily two provinces, Pacasmayo and Chepén.
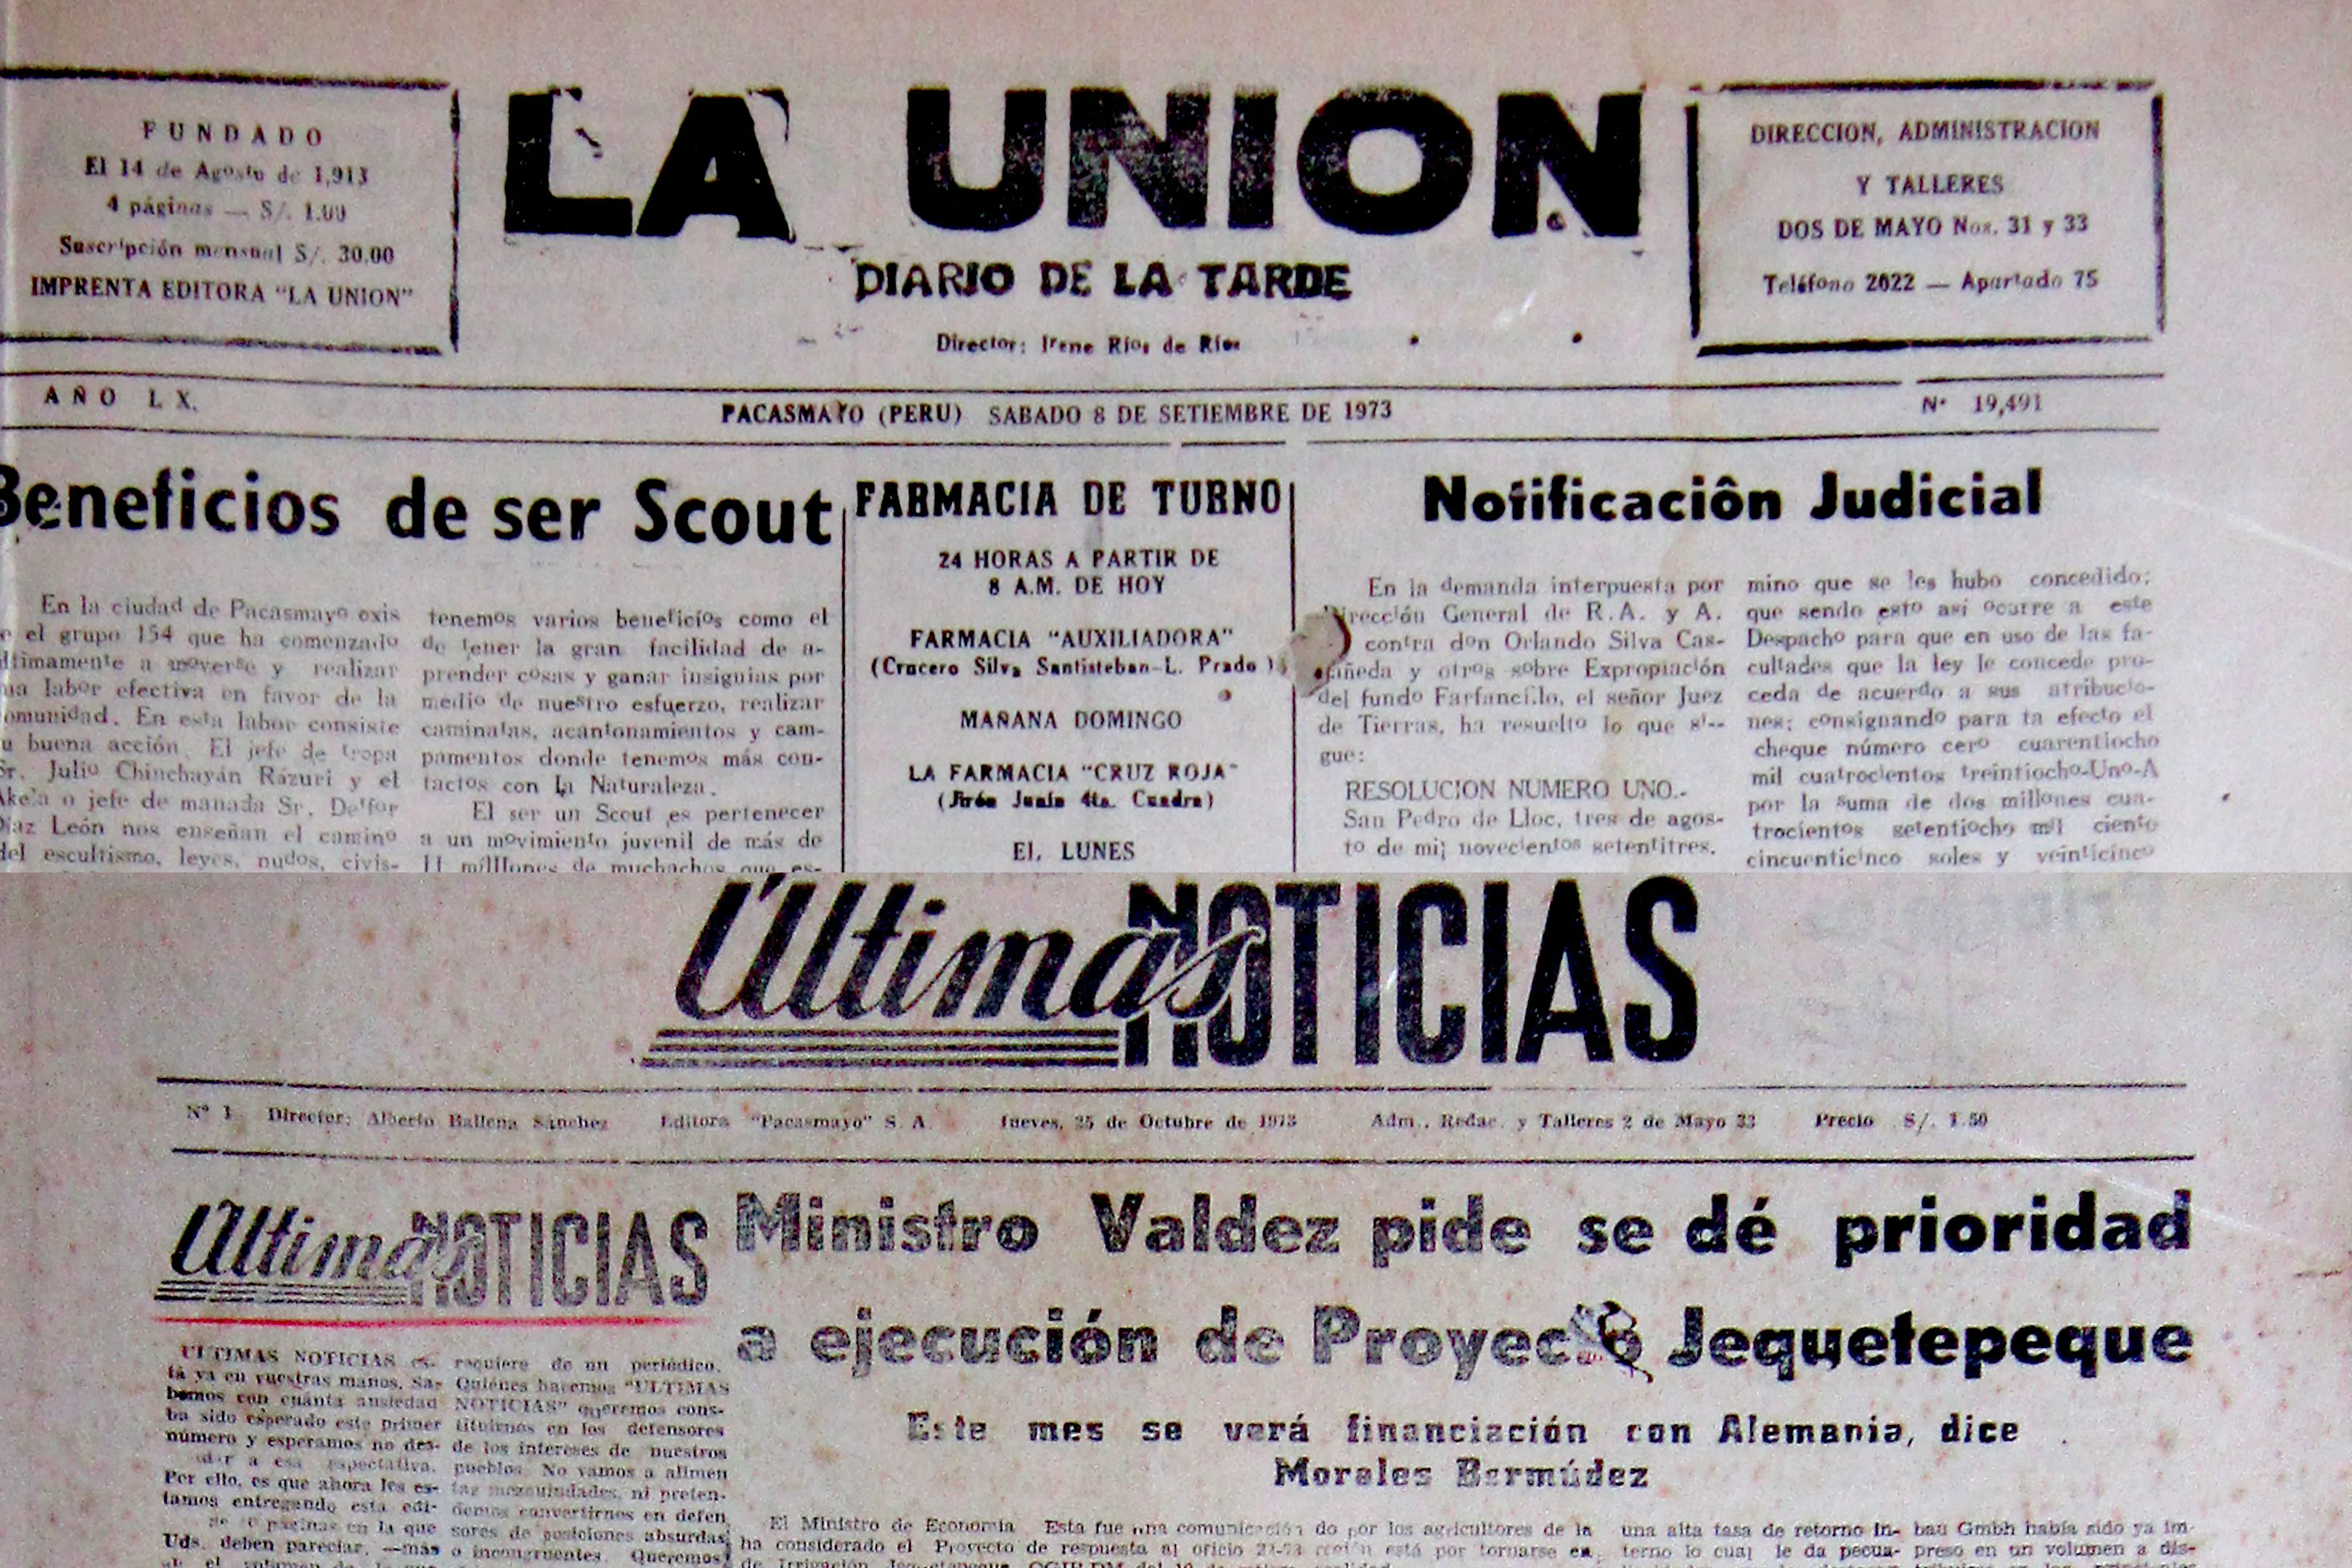
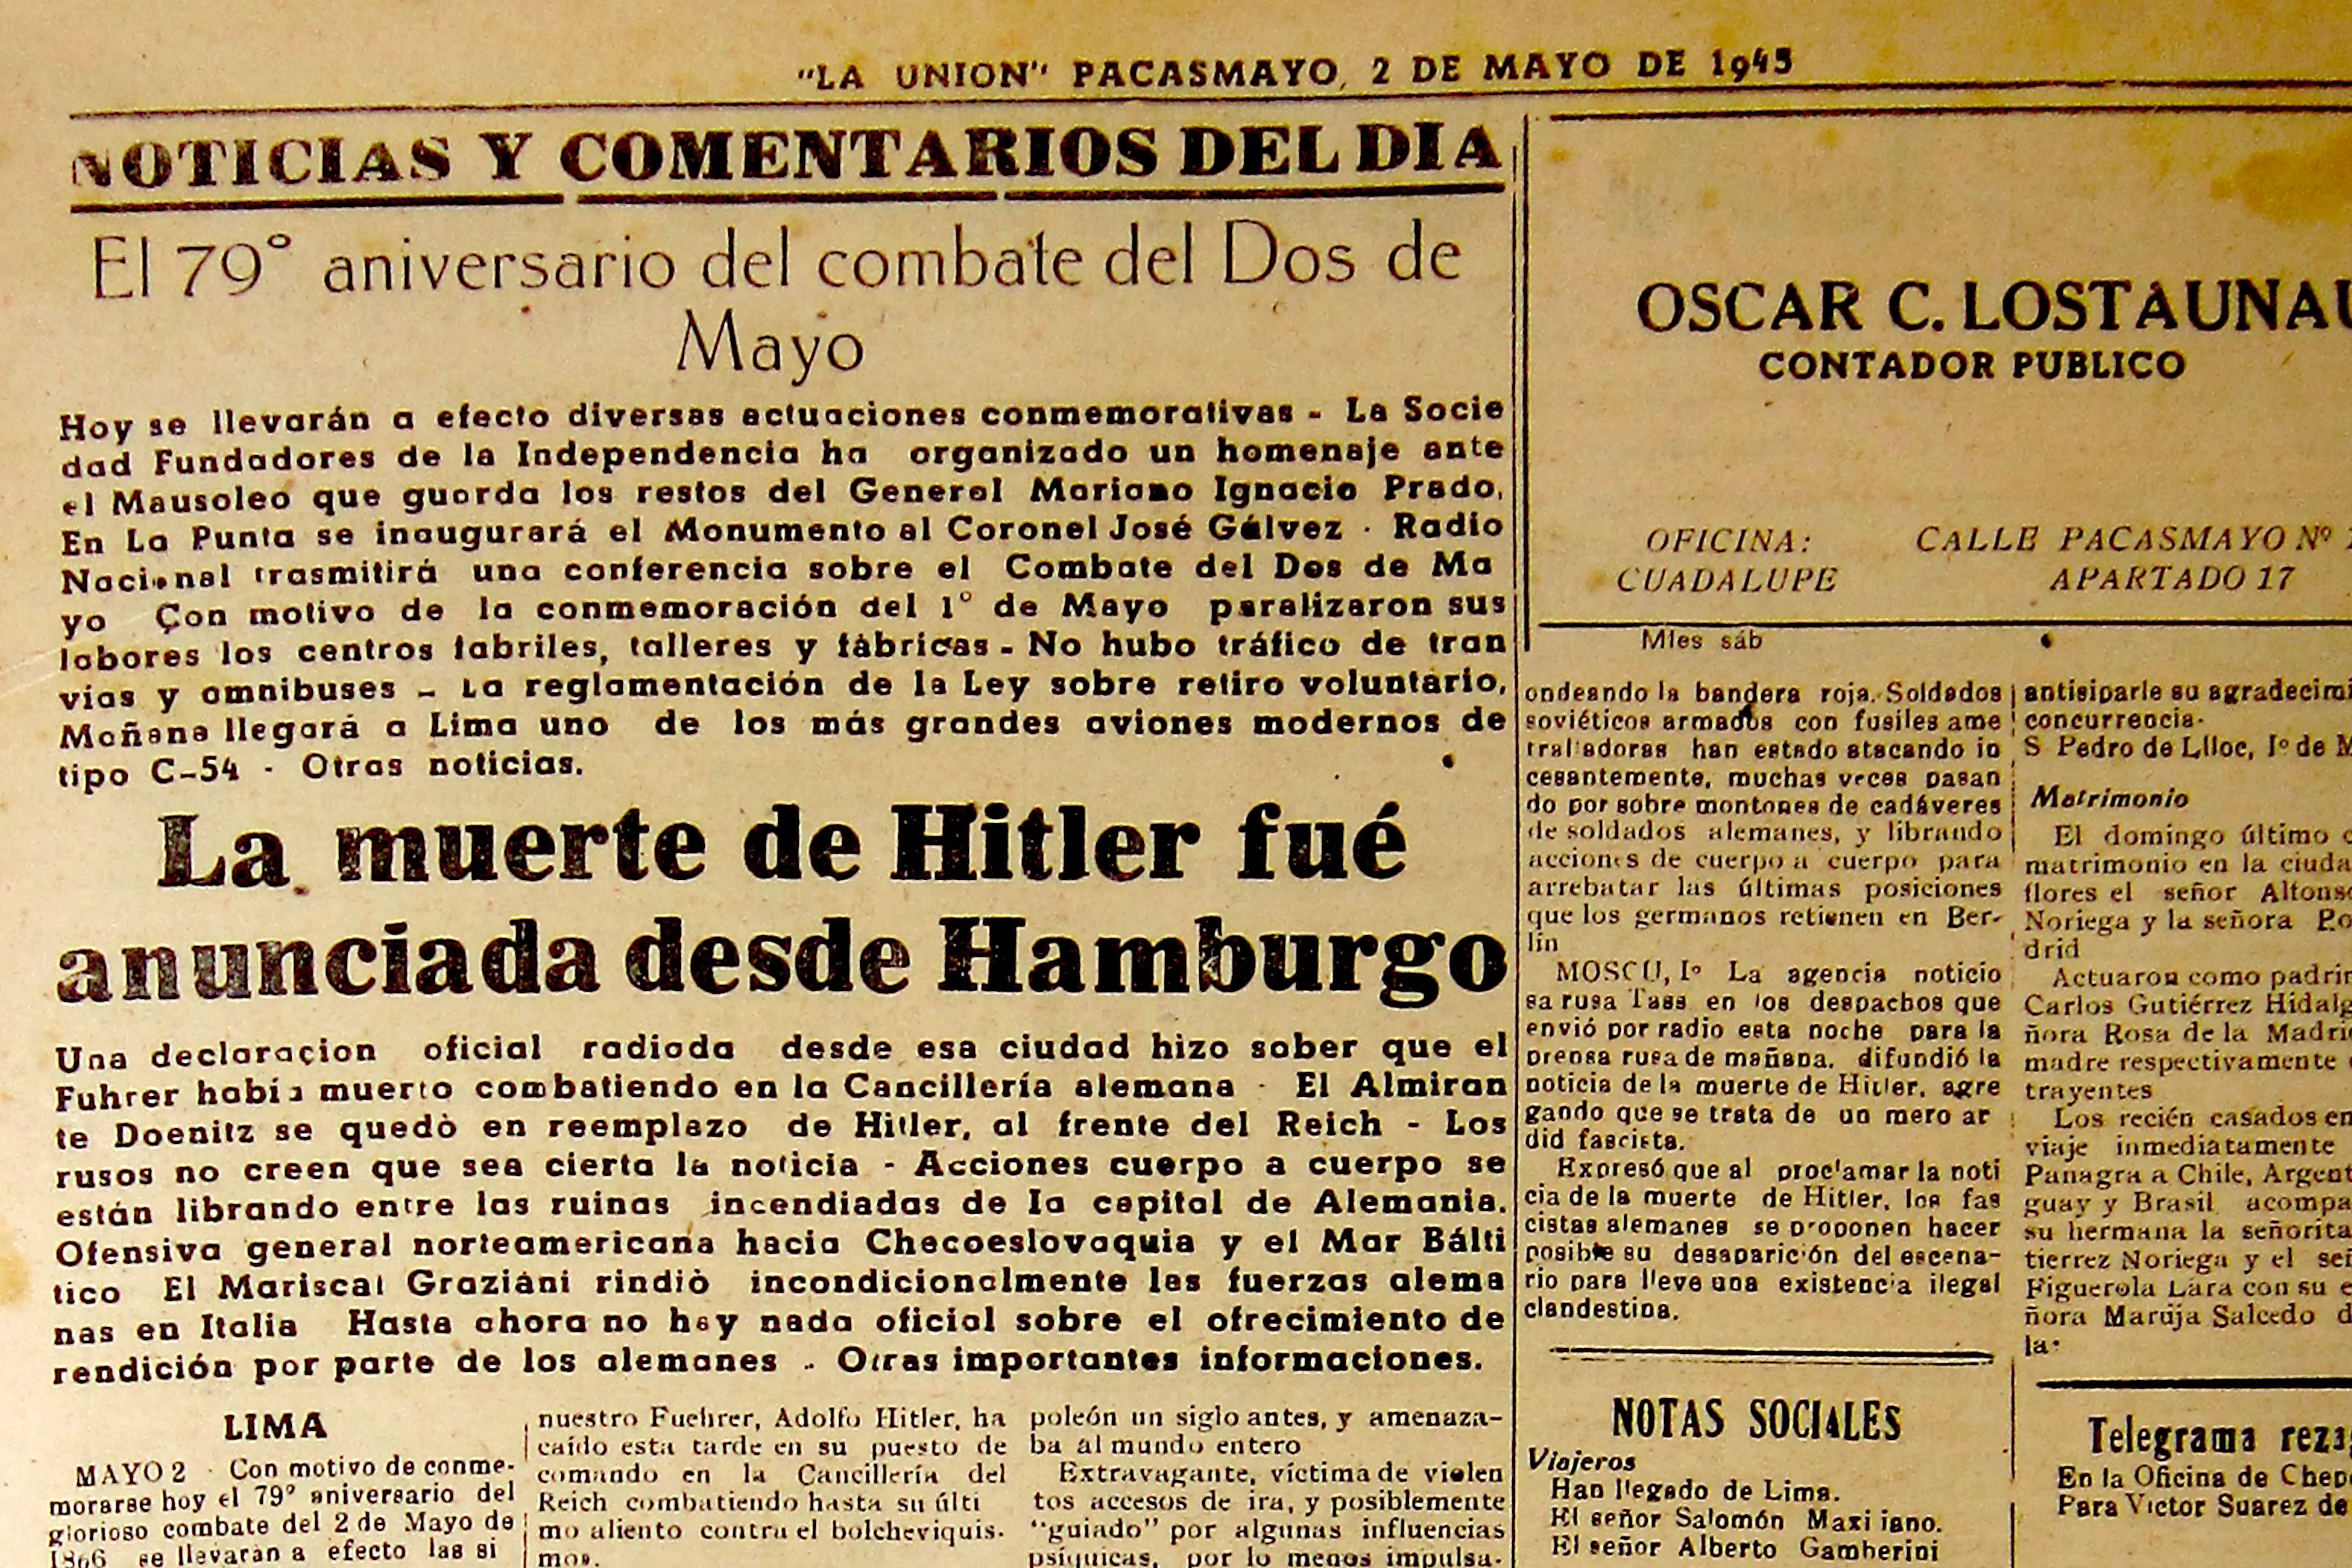
The newspaper archive stored by Últimas Noticias is made of two newspapers, La Unión (1914-1973), and Últimas Noticias (1973-today). La Unión was founded and directed by Manuel Pastor Rios. After his passing, my father, Alberto Ballena, founded the newspaper Últimas Noticias and continued the work until 2007. Then, it would be my sister, Maricarmen Ballena who would continue the work under the same name. To this day she finds the strength and fight within her to continue — what I know to be — the arduous labor of keeping people informed and giving a voice to those who don't have one.
This hyperlocal newspaper has gone through many phases over the years and offers a look at the past of the people, the province, and even the world.
The Contents
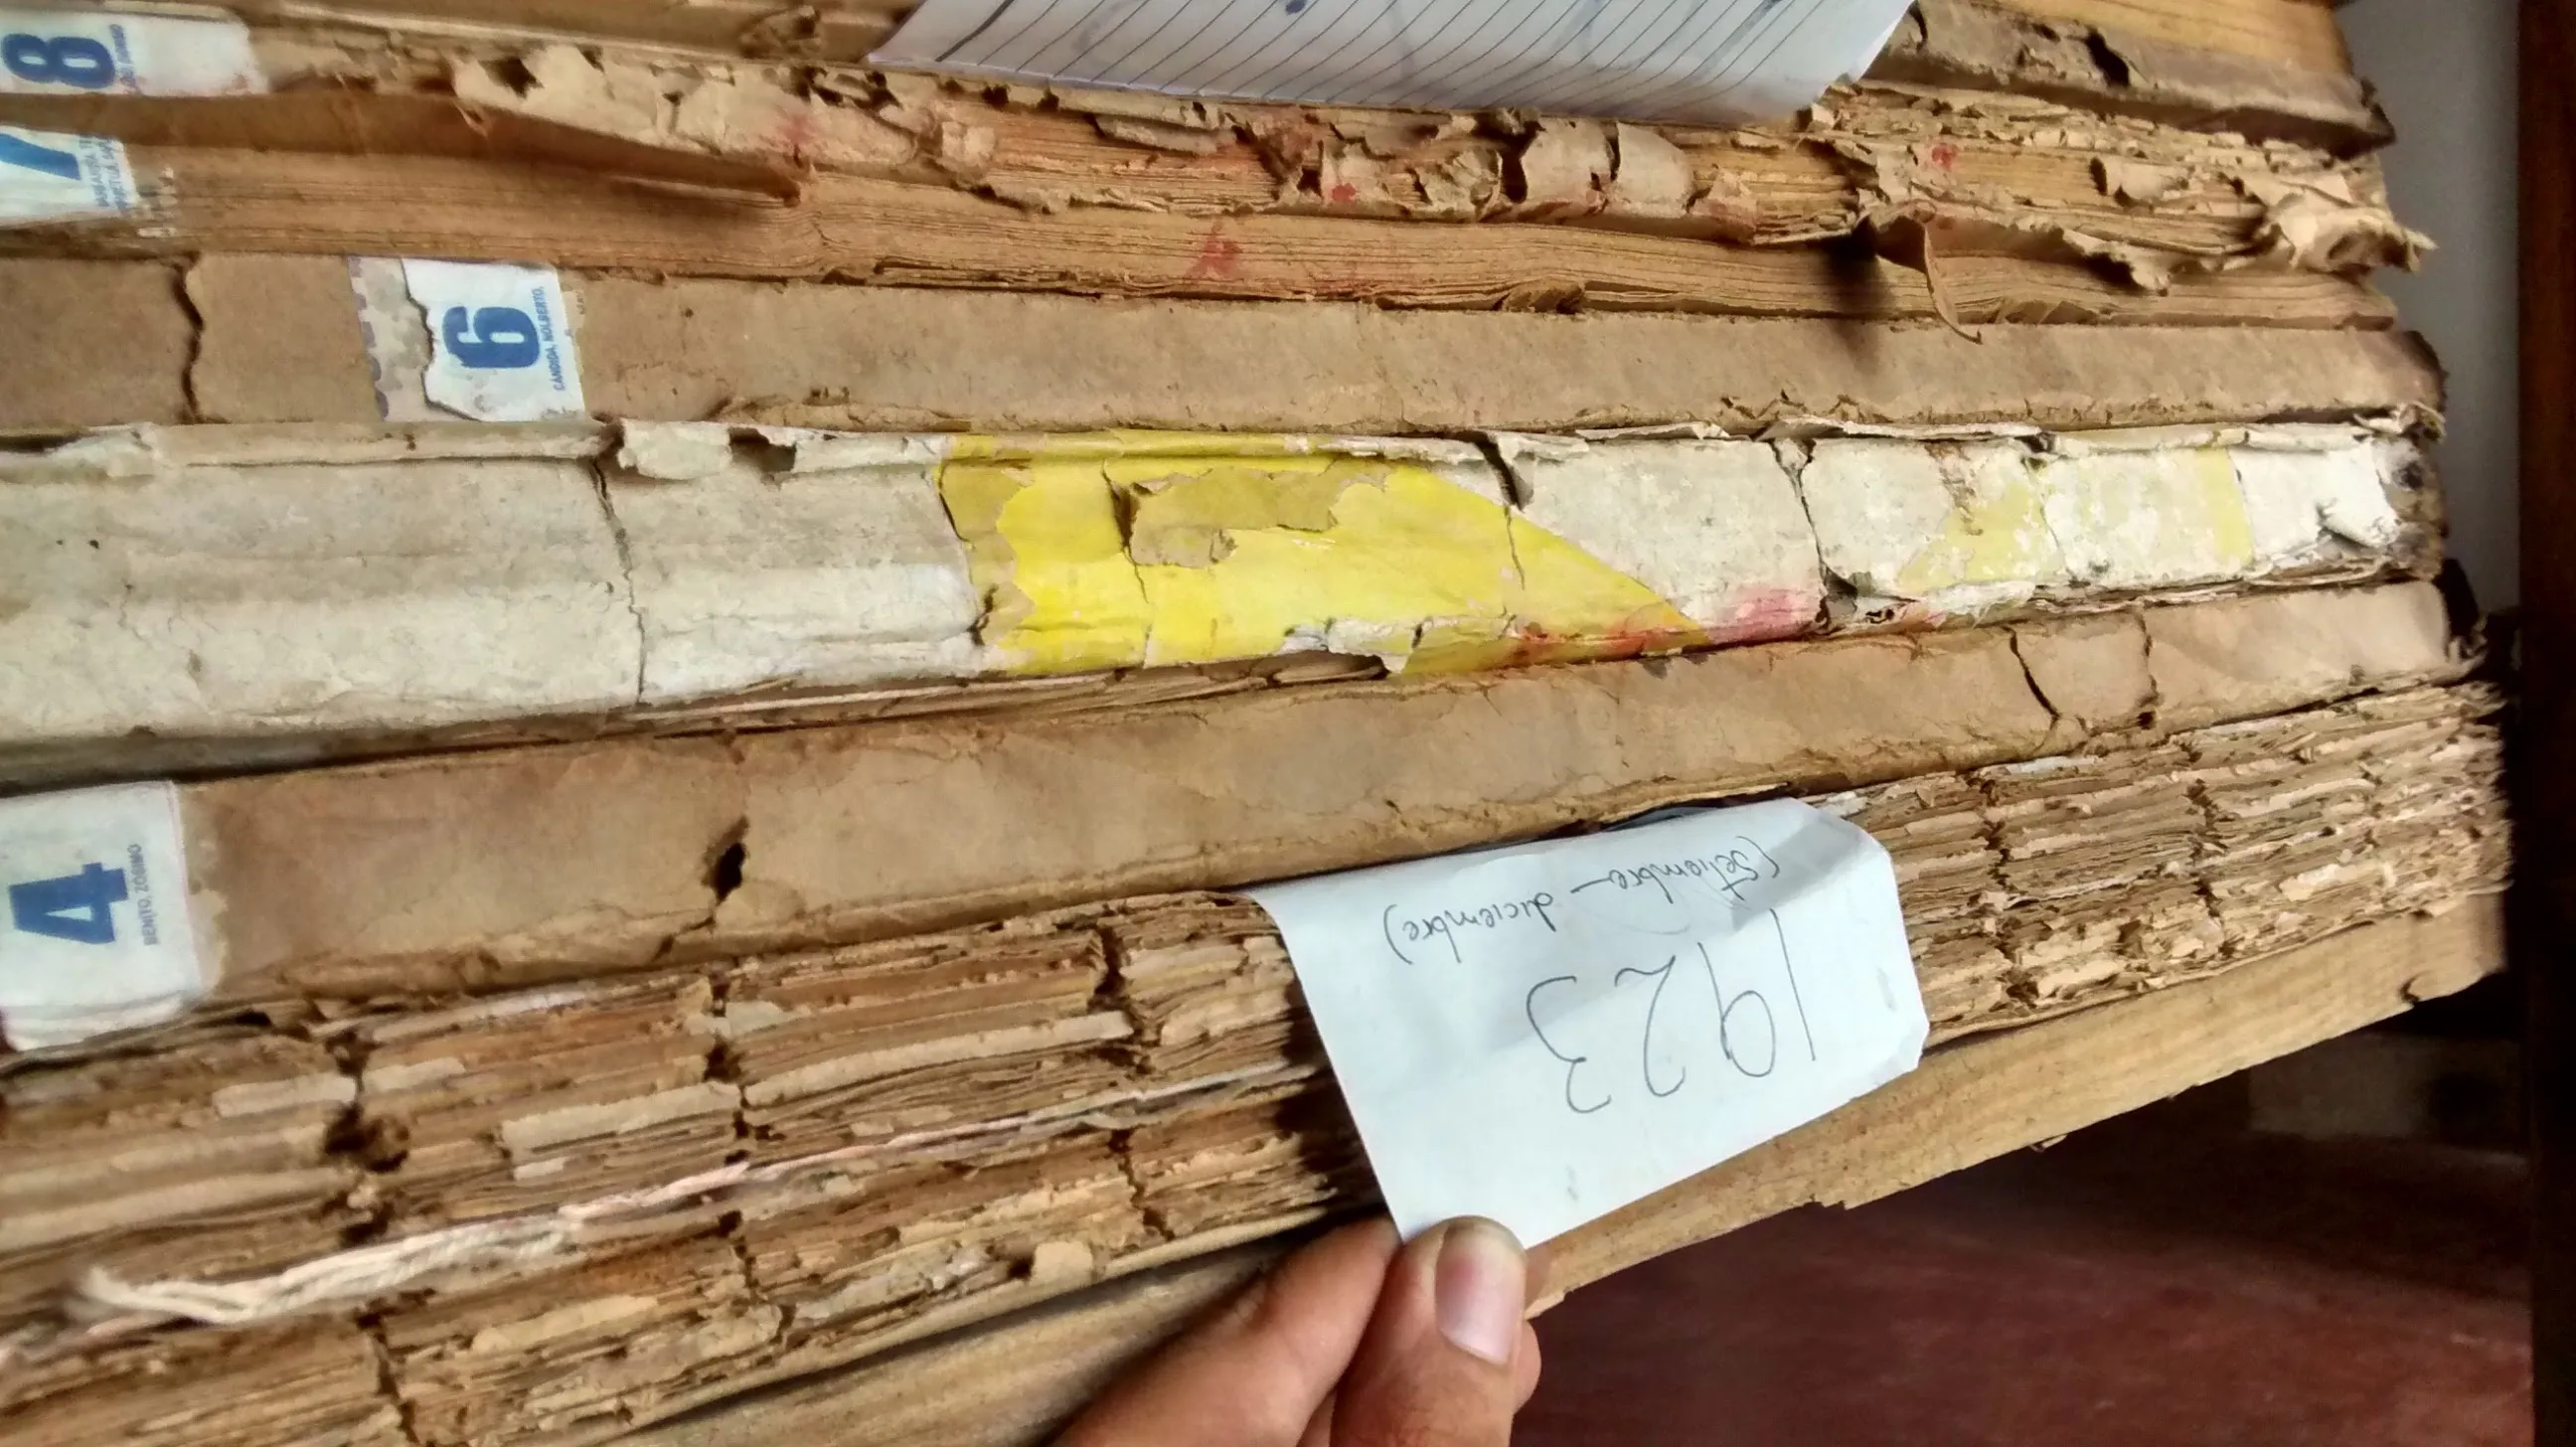
The archive is made up of hundreds of books of different sizes, pages, and thinknesses, depending on the dimensions of the issue at the tim. Some were twice as large as the current issue and the special issues could have as many as 46 pages — nearly 12x the standard!
The newspaper has unfortunately lacked the resources to ensure a more appropriate storage and some of the books are heavily deteriorated. Knowing the risks of maintaining the one physical copy of the archive in such conditions we set out to digitize it.
If you would like to support the newspaper consider making a donation 🙏 by contacting the team at save-the-archives@undiario.pe. Thank you!
The Build
Knowing the variations of the issues and after researching the many ways others had created DIY Scanners, we designed a version that we could easily build at a low cost. This was made of:
- 2x4 Wooden beams
- 3/4" MDF board
- Plexiglass
- Small aluminum pulleys
- Thin steel wire rope
- Bearing rails
- 2 L-Brackets
- 2 Canon Powershot Cameras
- A
RaspeberryPicommon PC
Hardware
The hardware can be broken down into four parts, the scanner bed, the scanner lid, the frame that held them together, and the electronics.
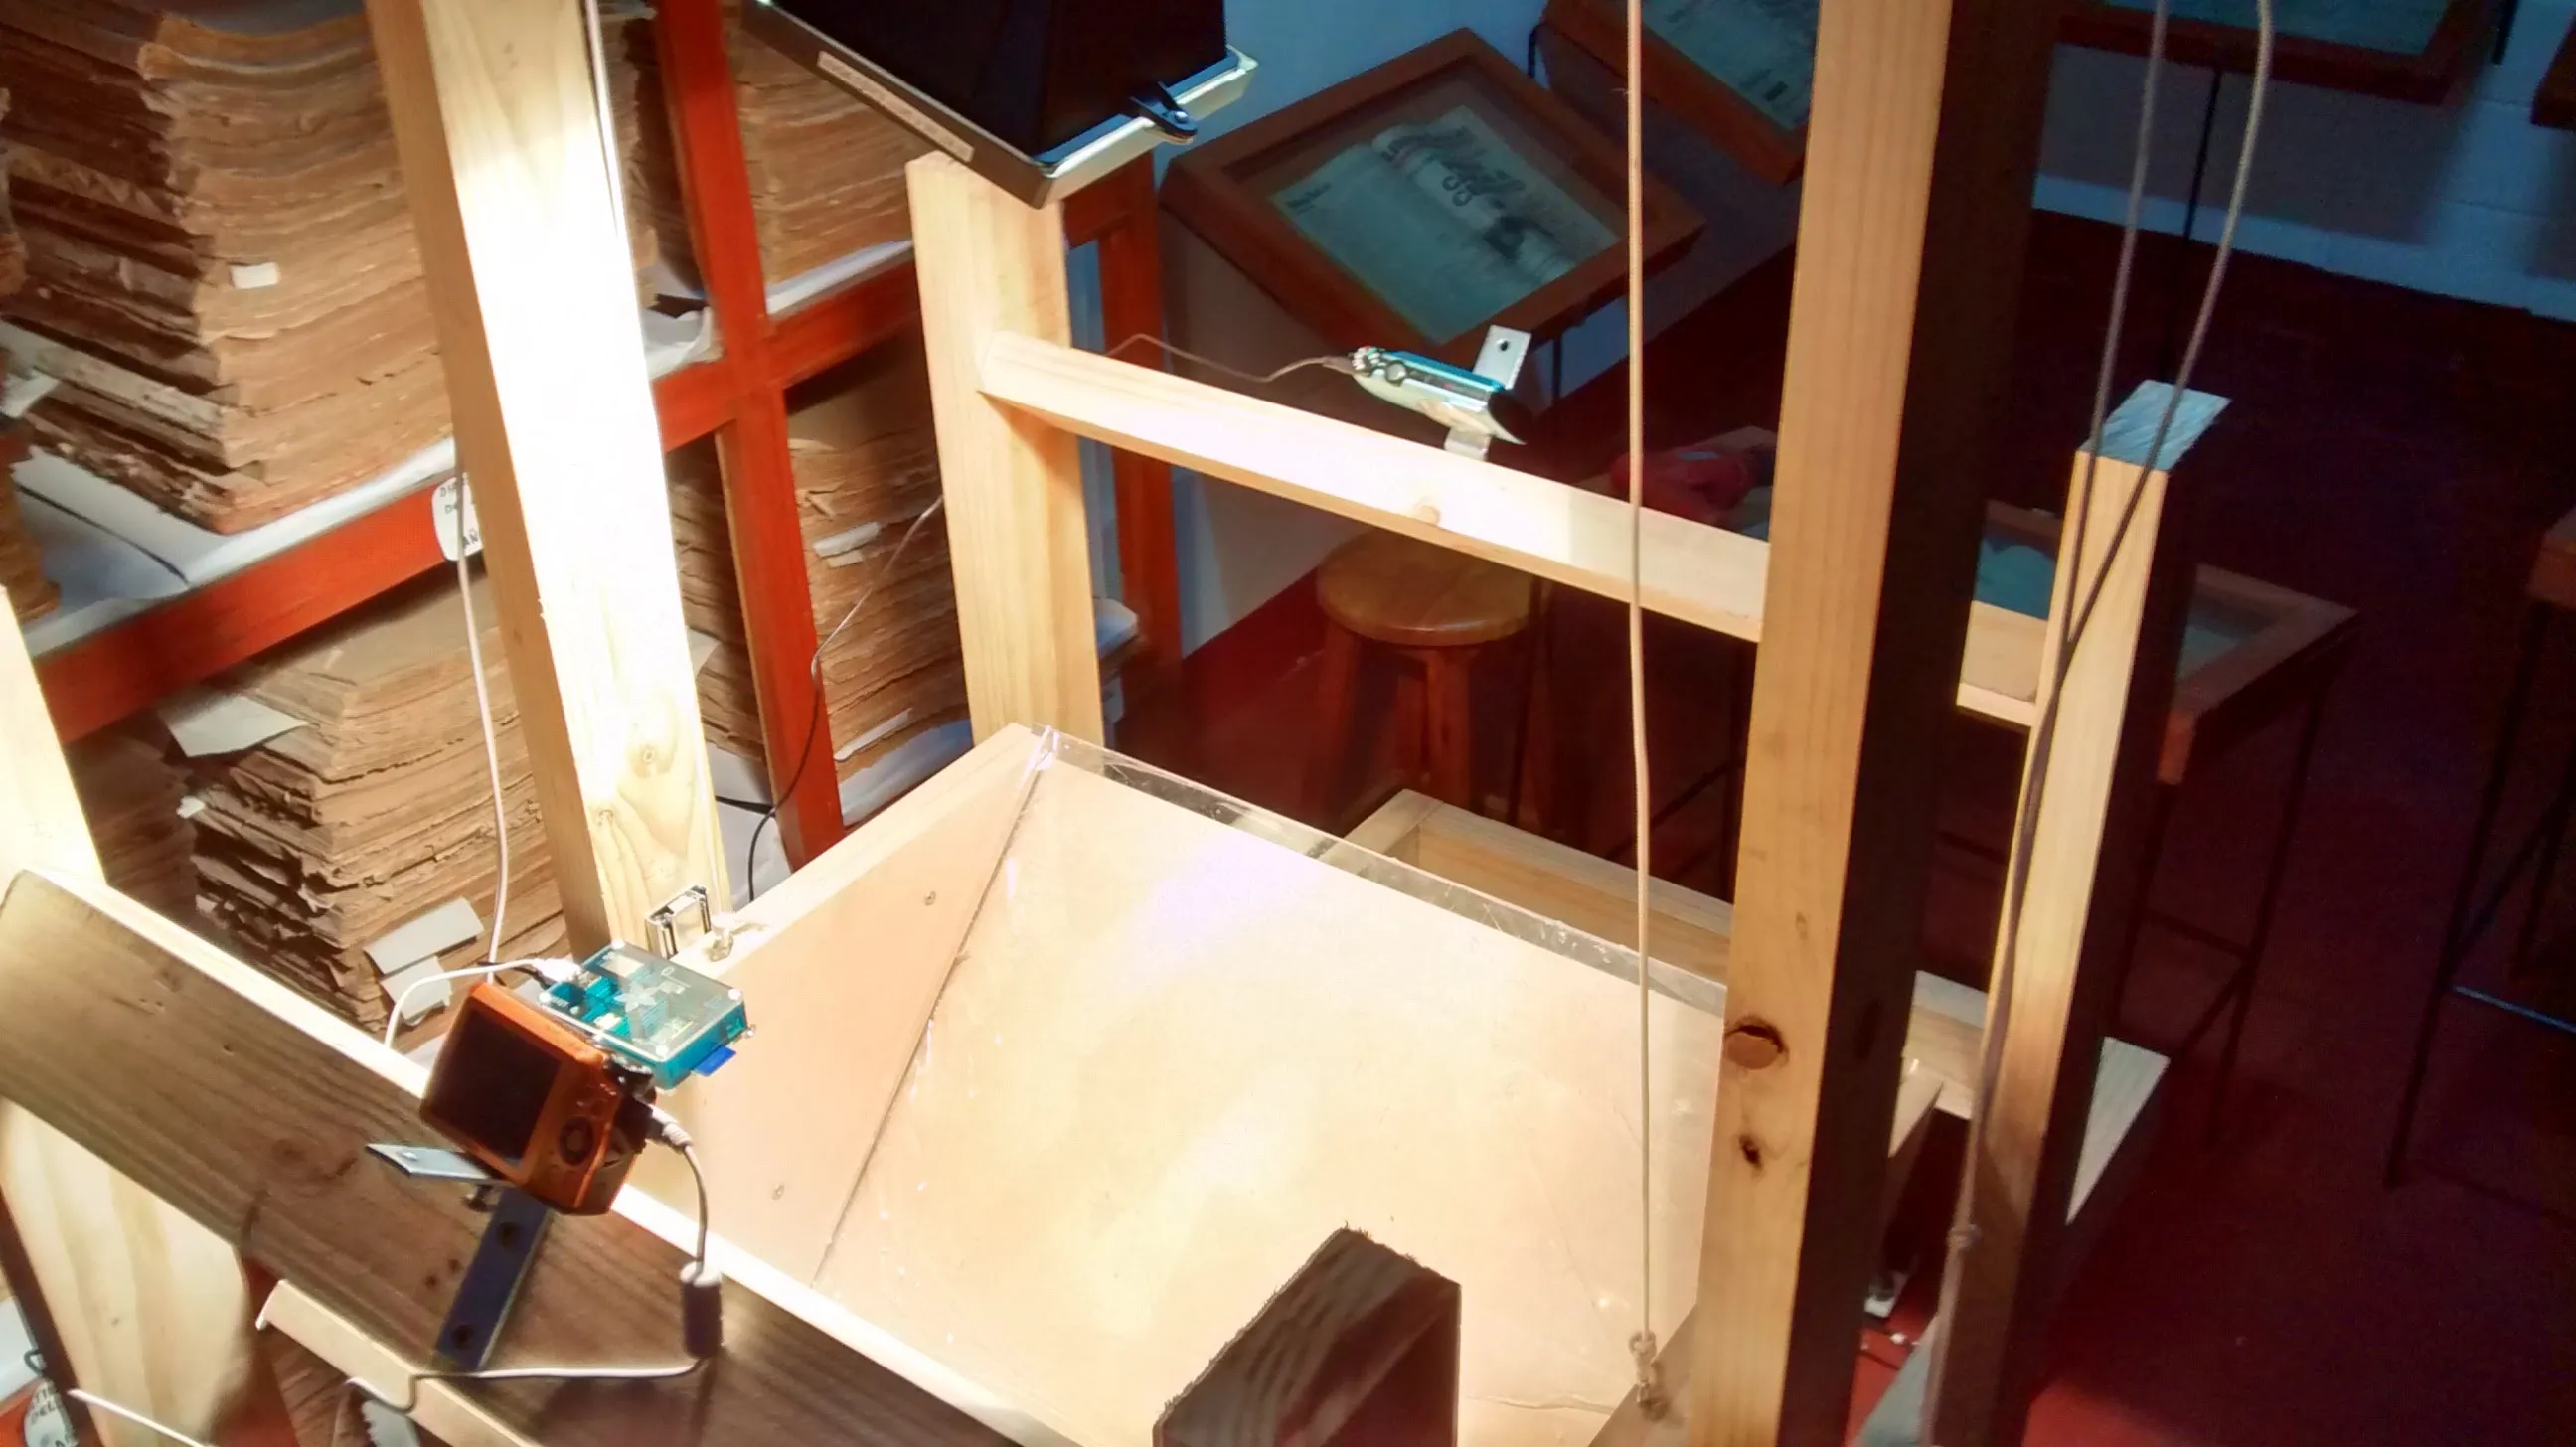
The scanner bed was designed to be a V-shapped platform with a variable width controlled by two long threaded bolts. The opening at the bottom of the platform allowed us to fit the different spine widths and hold the book in place, while ensuring enough aperture for the lid to be placed on top.
Over the bed came a V-shapped scanner lid which flattened the page to reduce wrinkles and image distortions. The lid was made of 2 plexiglass rectangles attached to two triangular pieces of MDF board to hold them together and provide weight.

The frame gave the scanner the proper height for someone to use it and and held the lid on top of the bed. Allowing for the two pieces to move as needed.
Because of the size of the books we needed ample room when switching from one to another, unfortunately the lid left little of it. To resolve this, the scanner bed had to move away from under the lid when switching books. This was achieved by placing the bed on rails that were strong enough to hold the weight of the scanner bed and the heaviest editions. When the lid was lifted, the bed rolled to the right, the book was switched and the bed and book rolled back under the lid.
Once the scanner bed and the book were in place, the lid needs to be lowered and pressed against them. This vertical movement was achieved by attaching hooks to the wooden supports of the lid and hanging them via cables to the main beam of the frame. The cables ran through pulleys attached to the beam and were accessible to the user in front of the scanner pulled the wires to lift the lid. When the scanner bed was in place, the lid was rolled down for the first scan and when a page needed to be turned, it was lifted and then rolled down again.
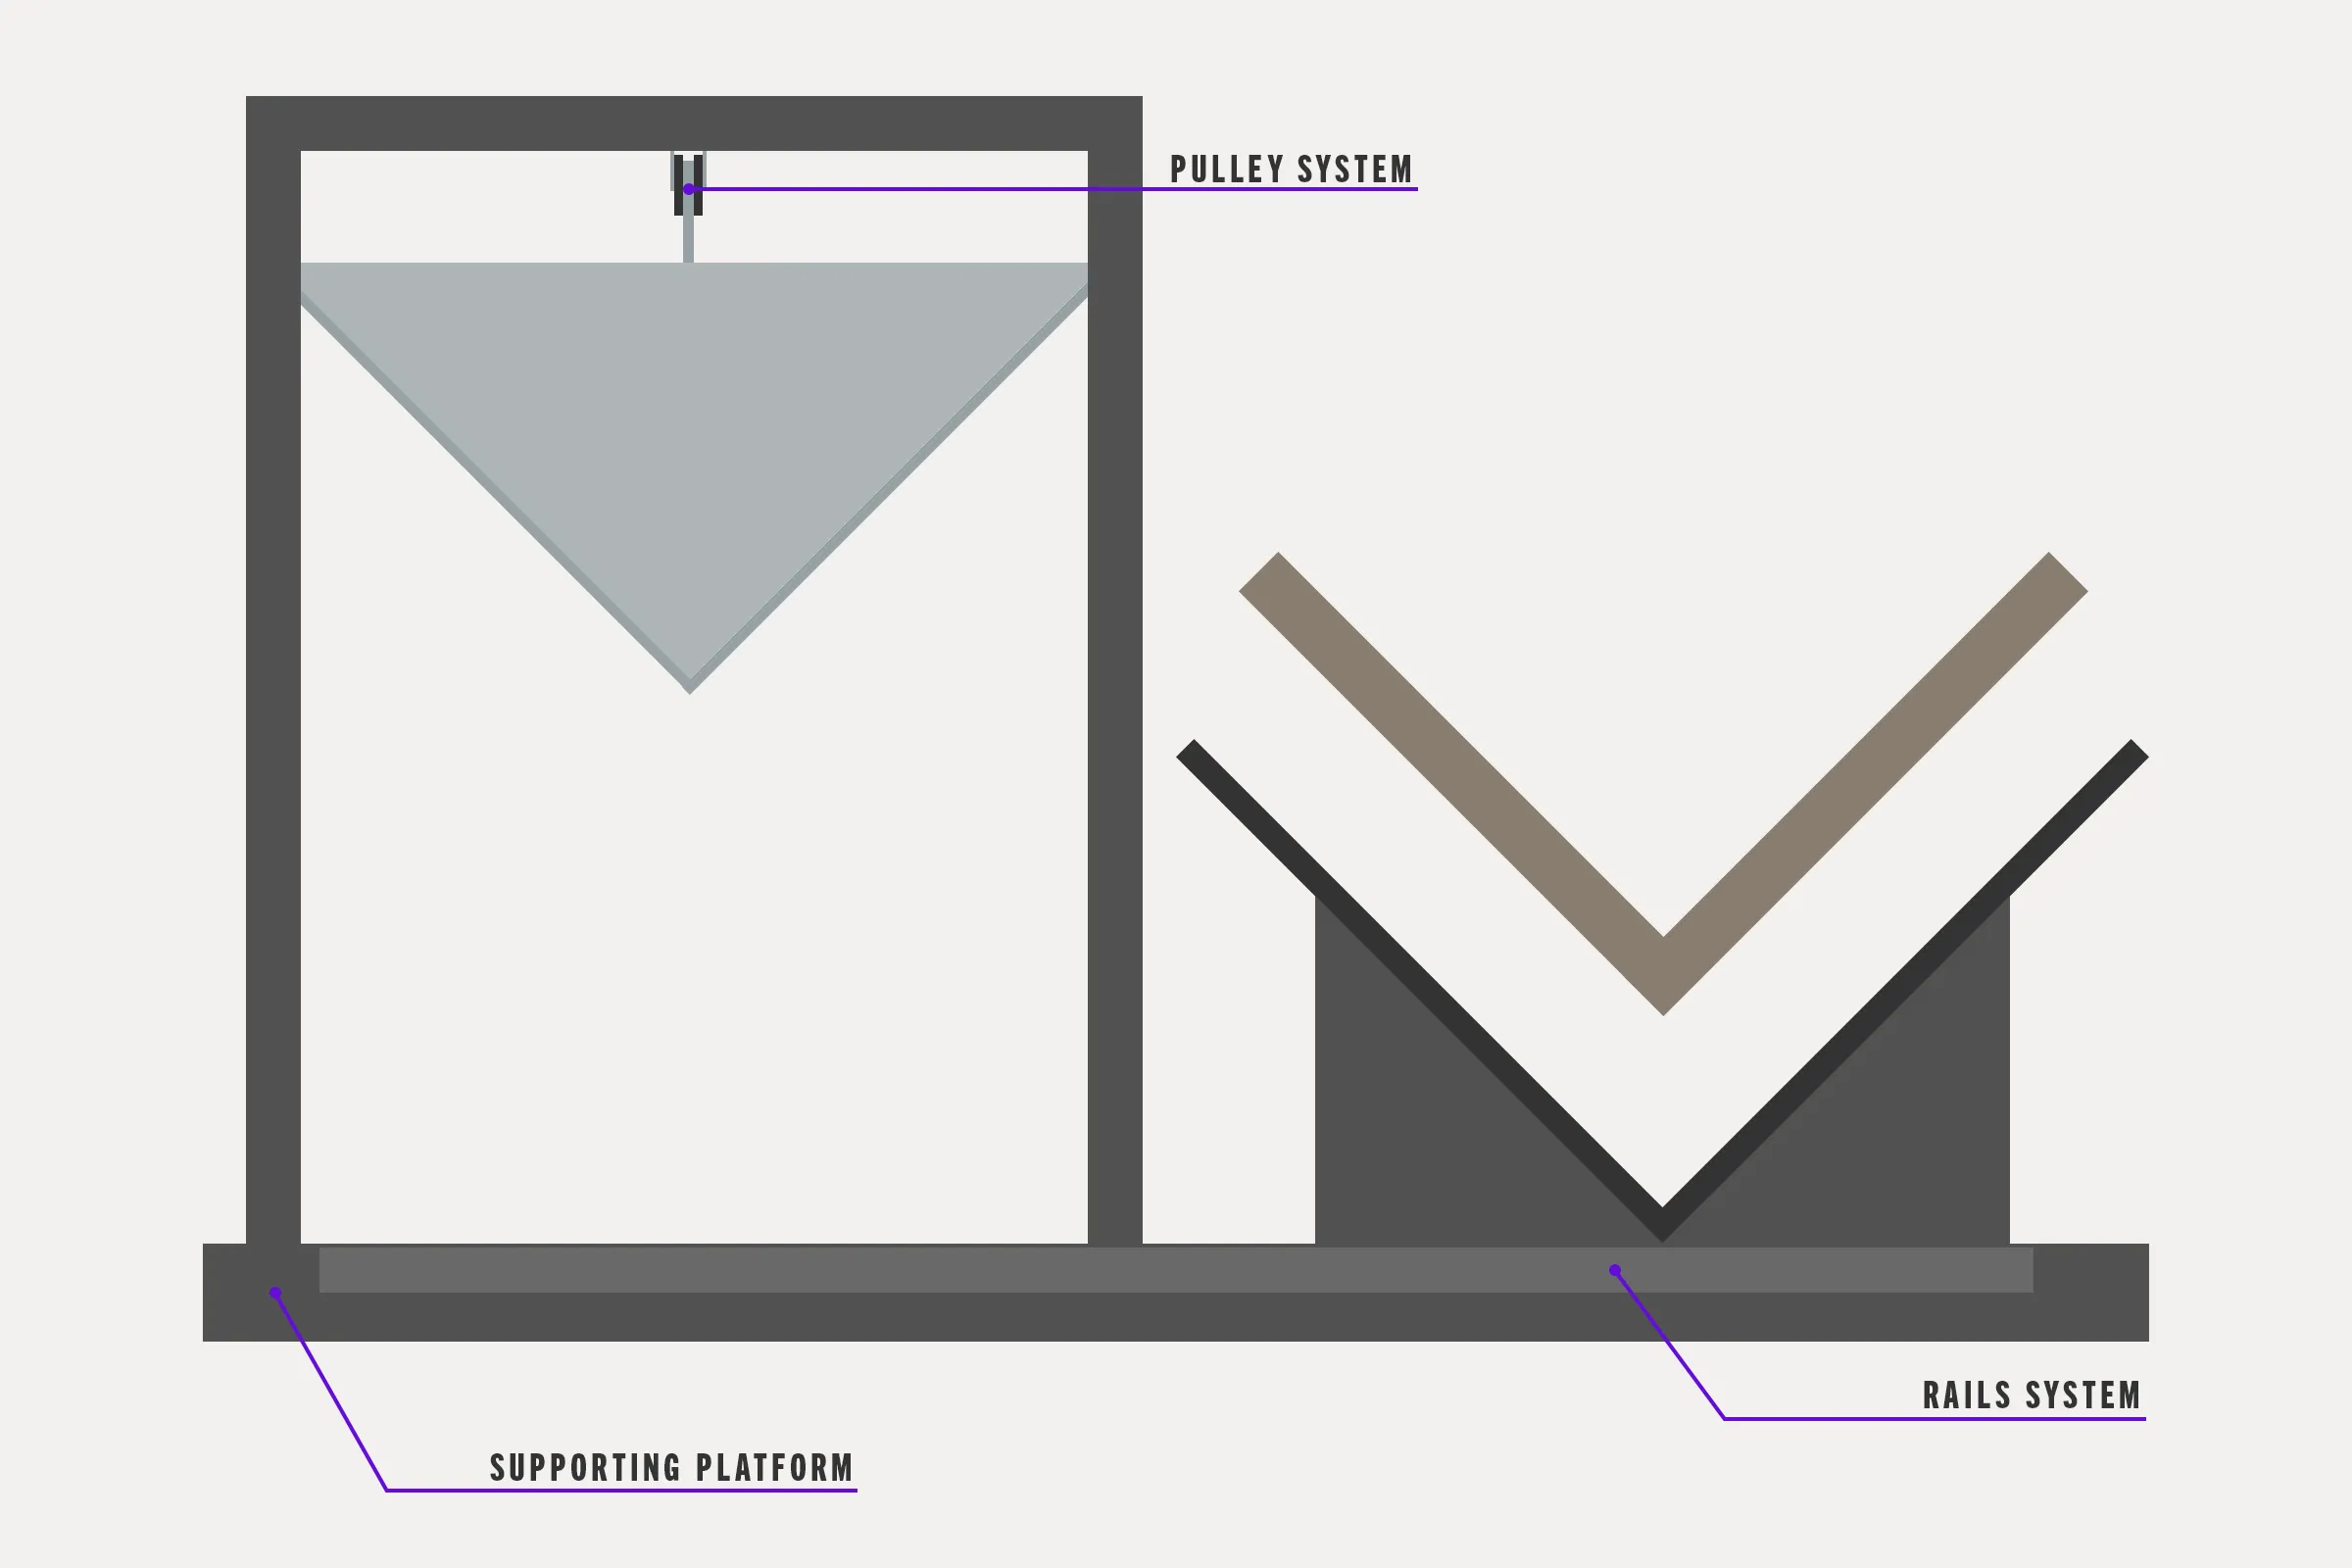
This simple but effective mechanism made it possible to easily change from page to page and book to book.
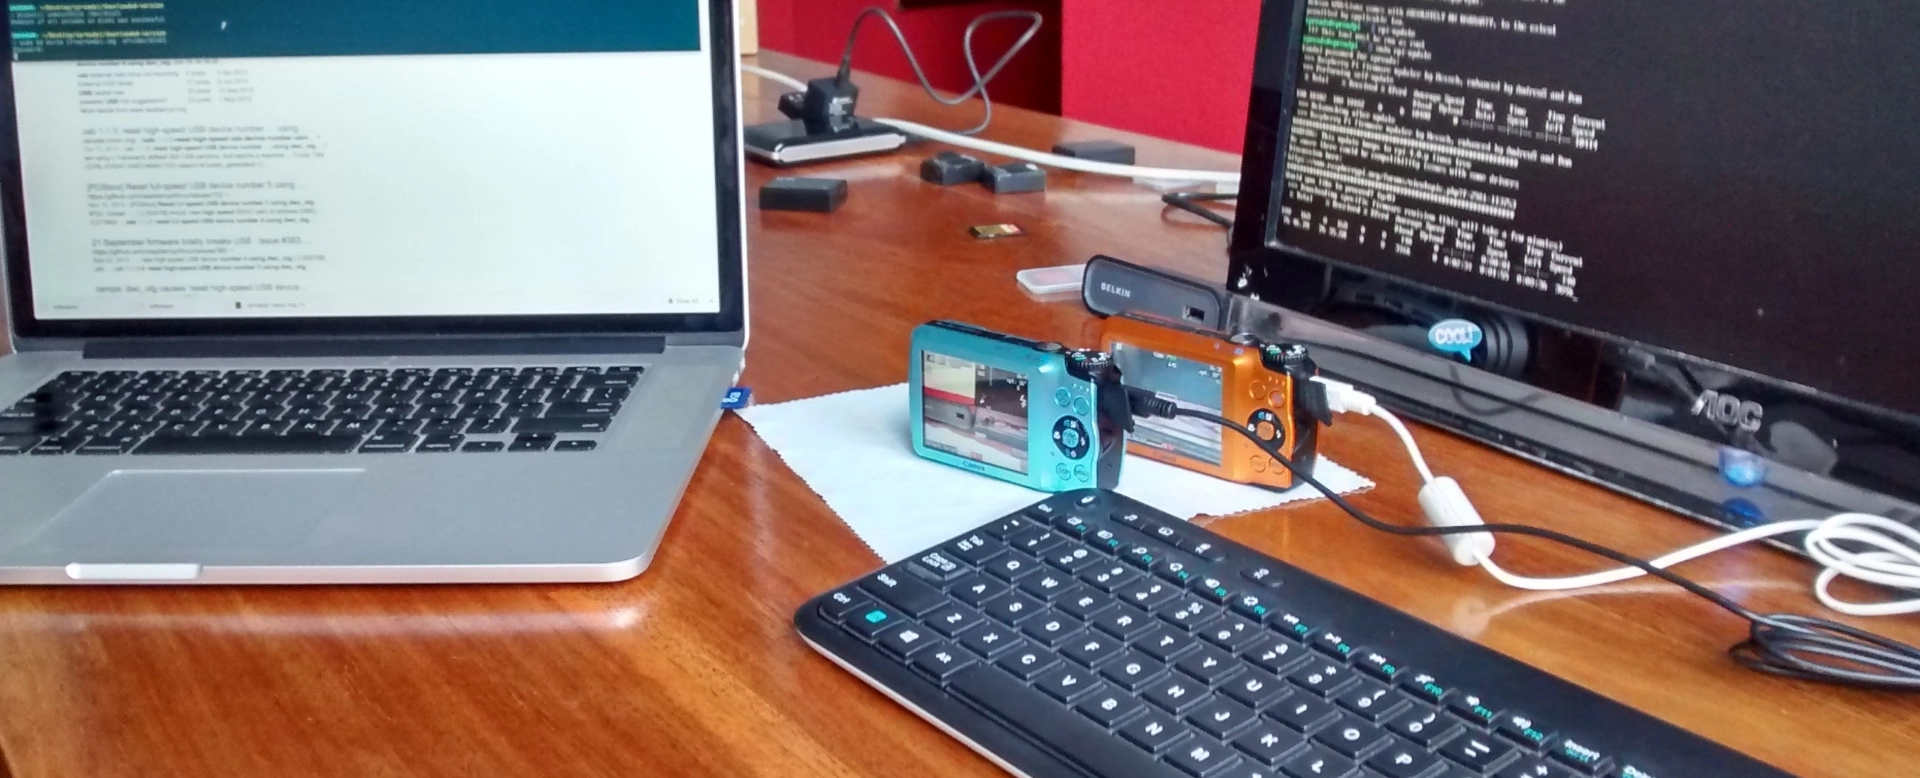
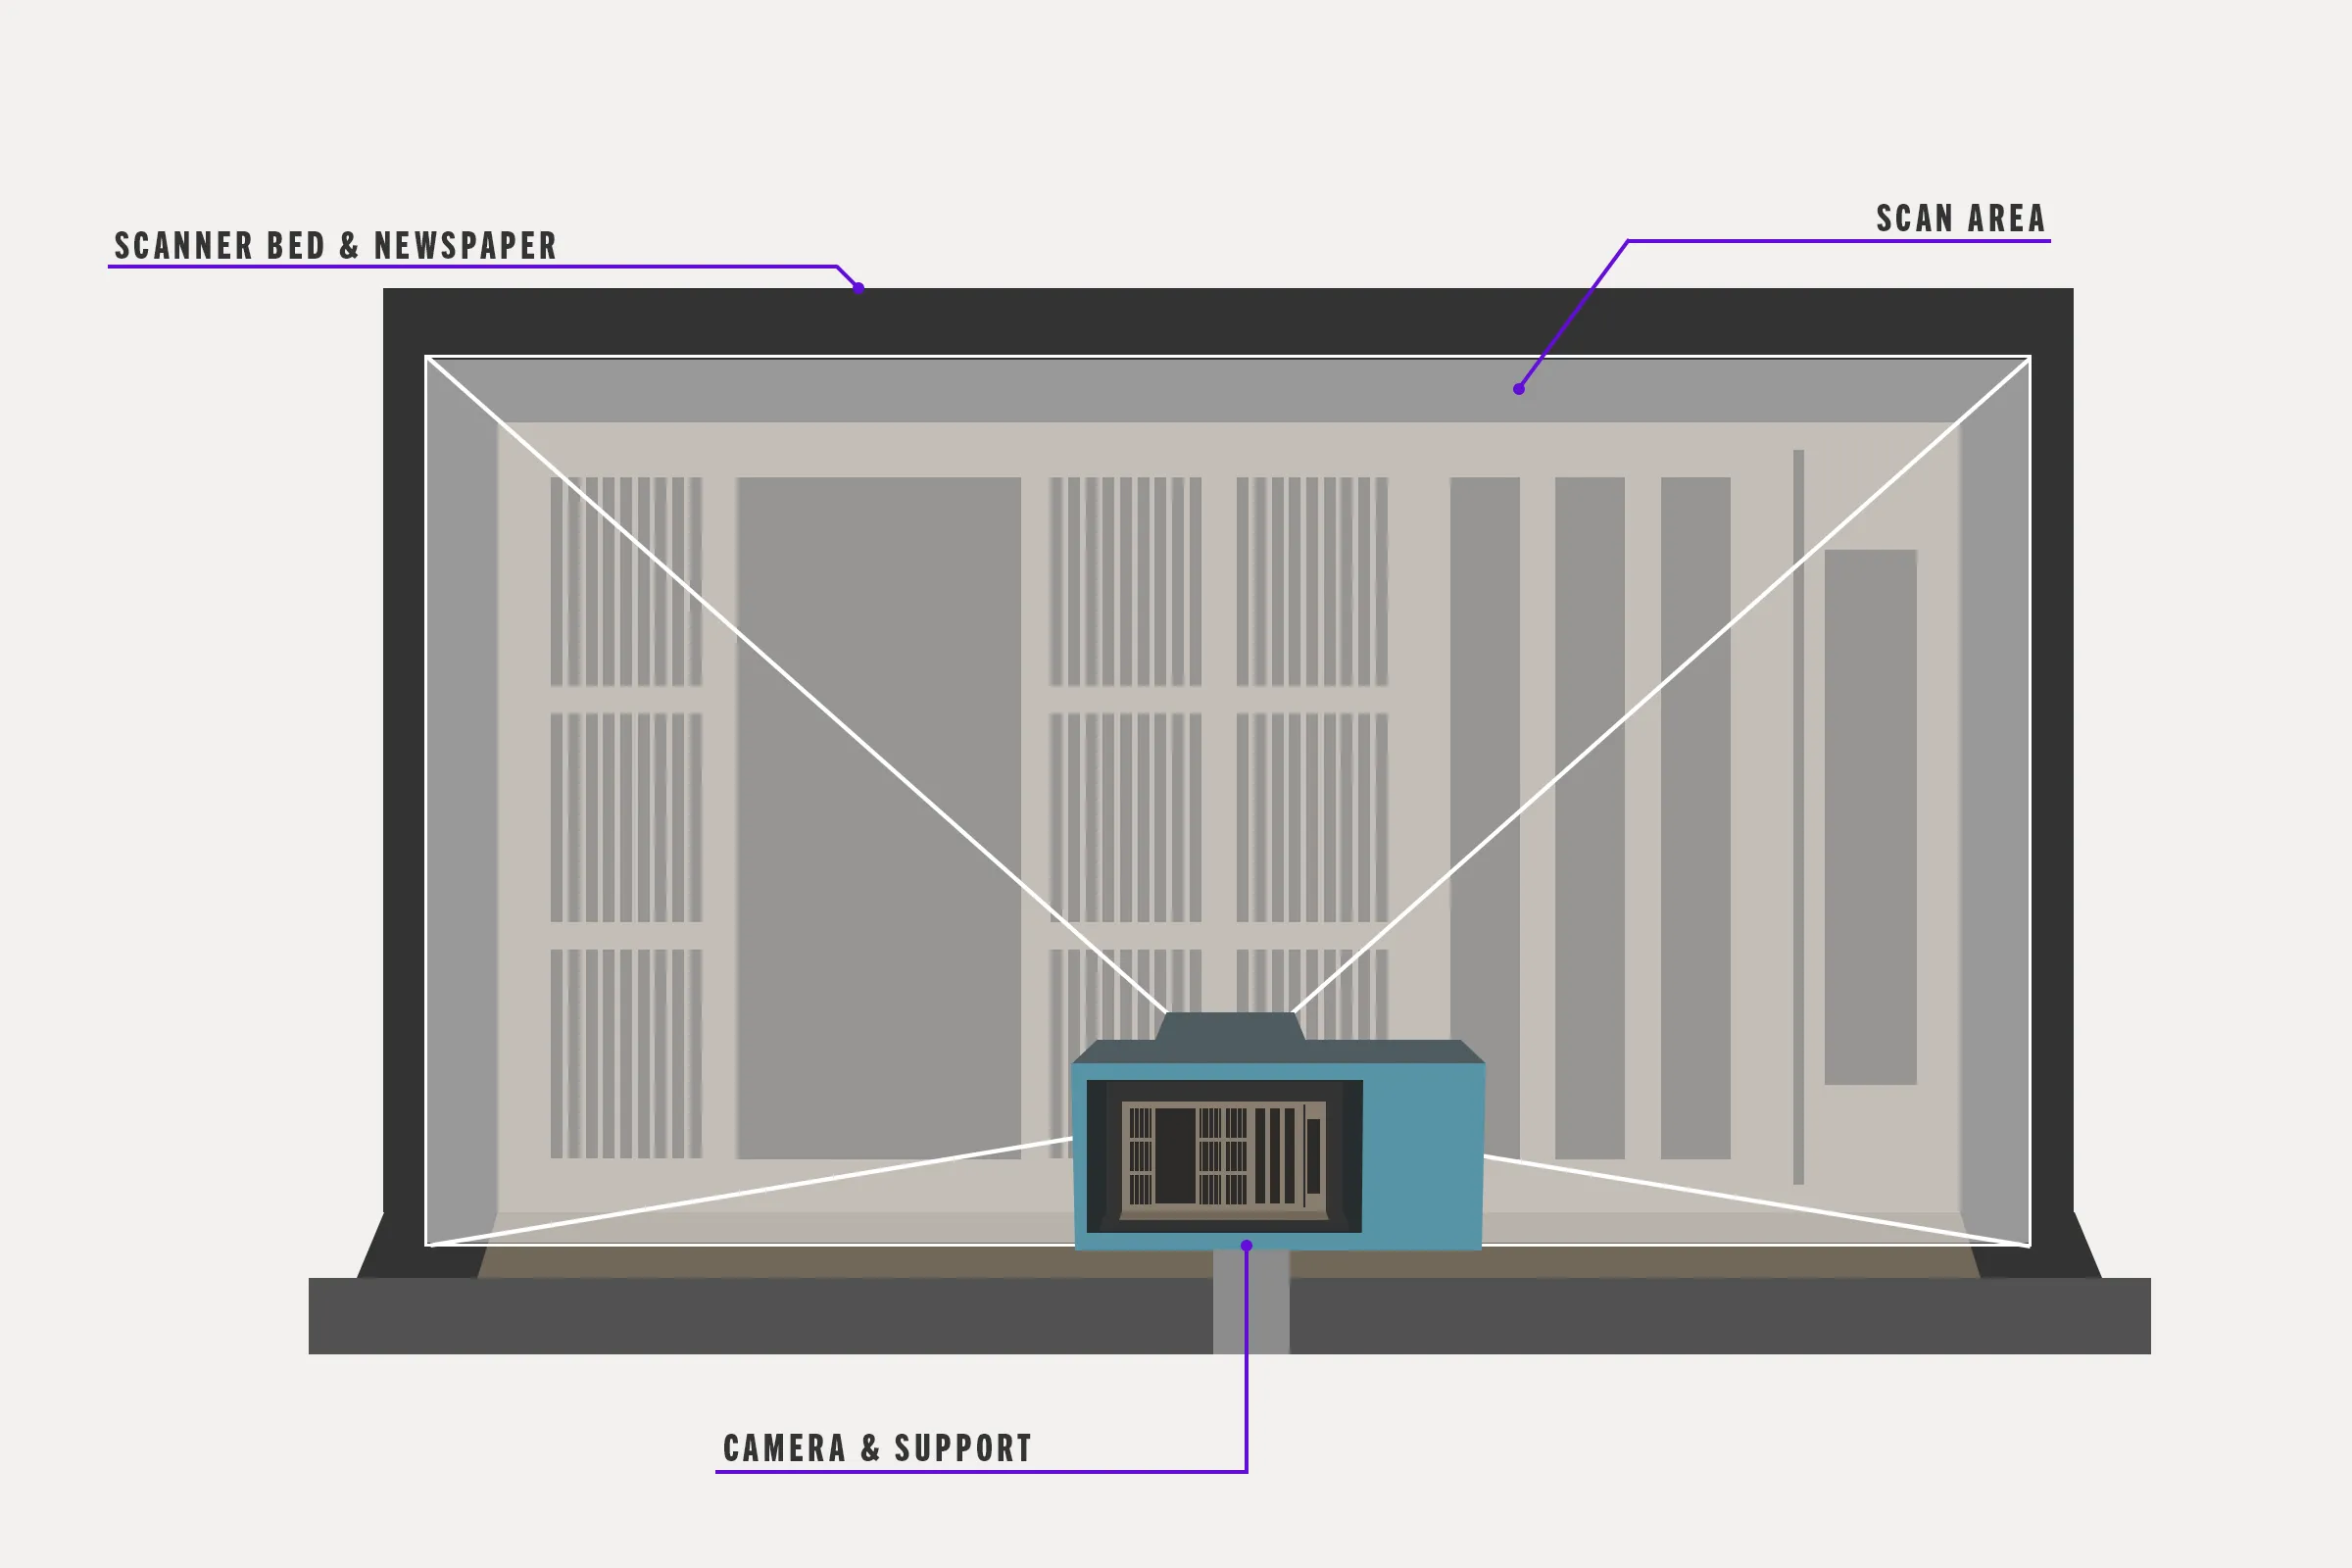
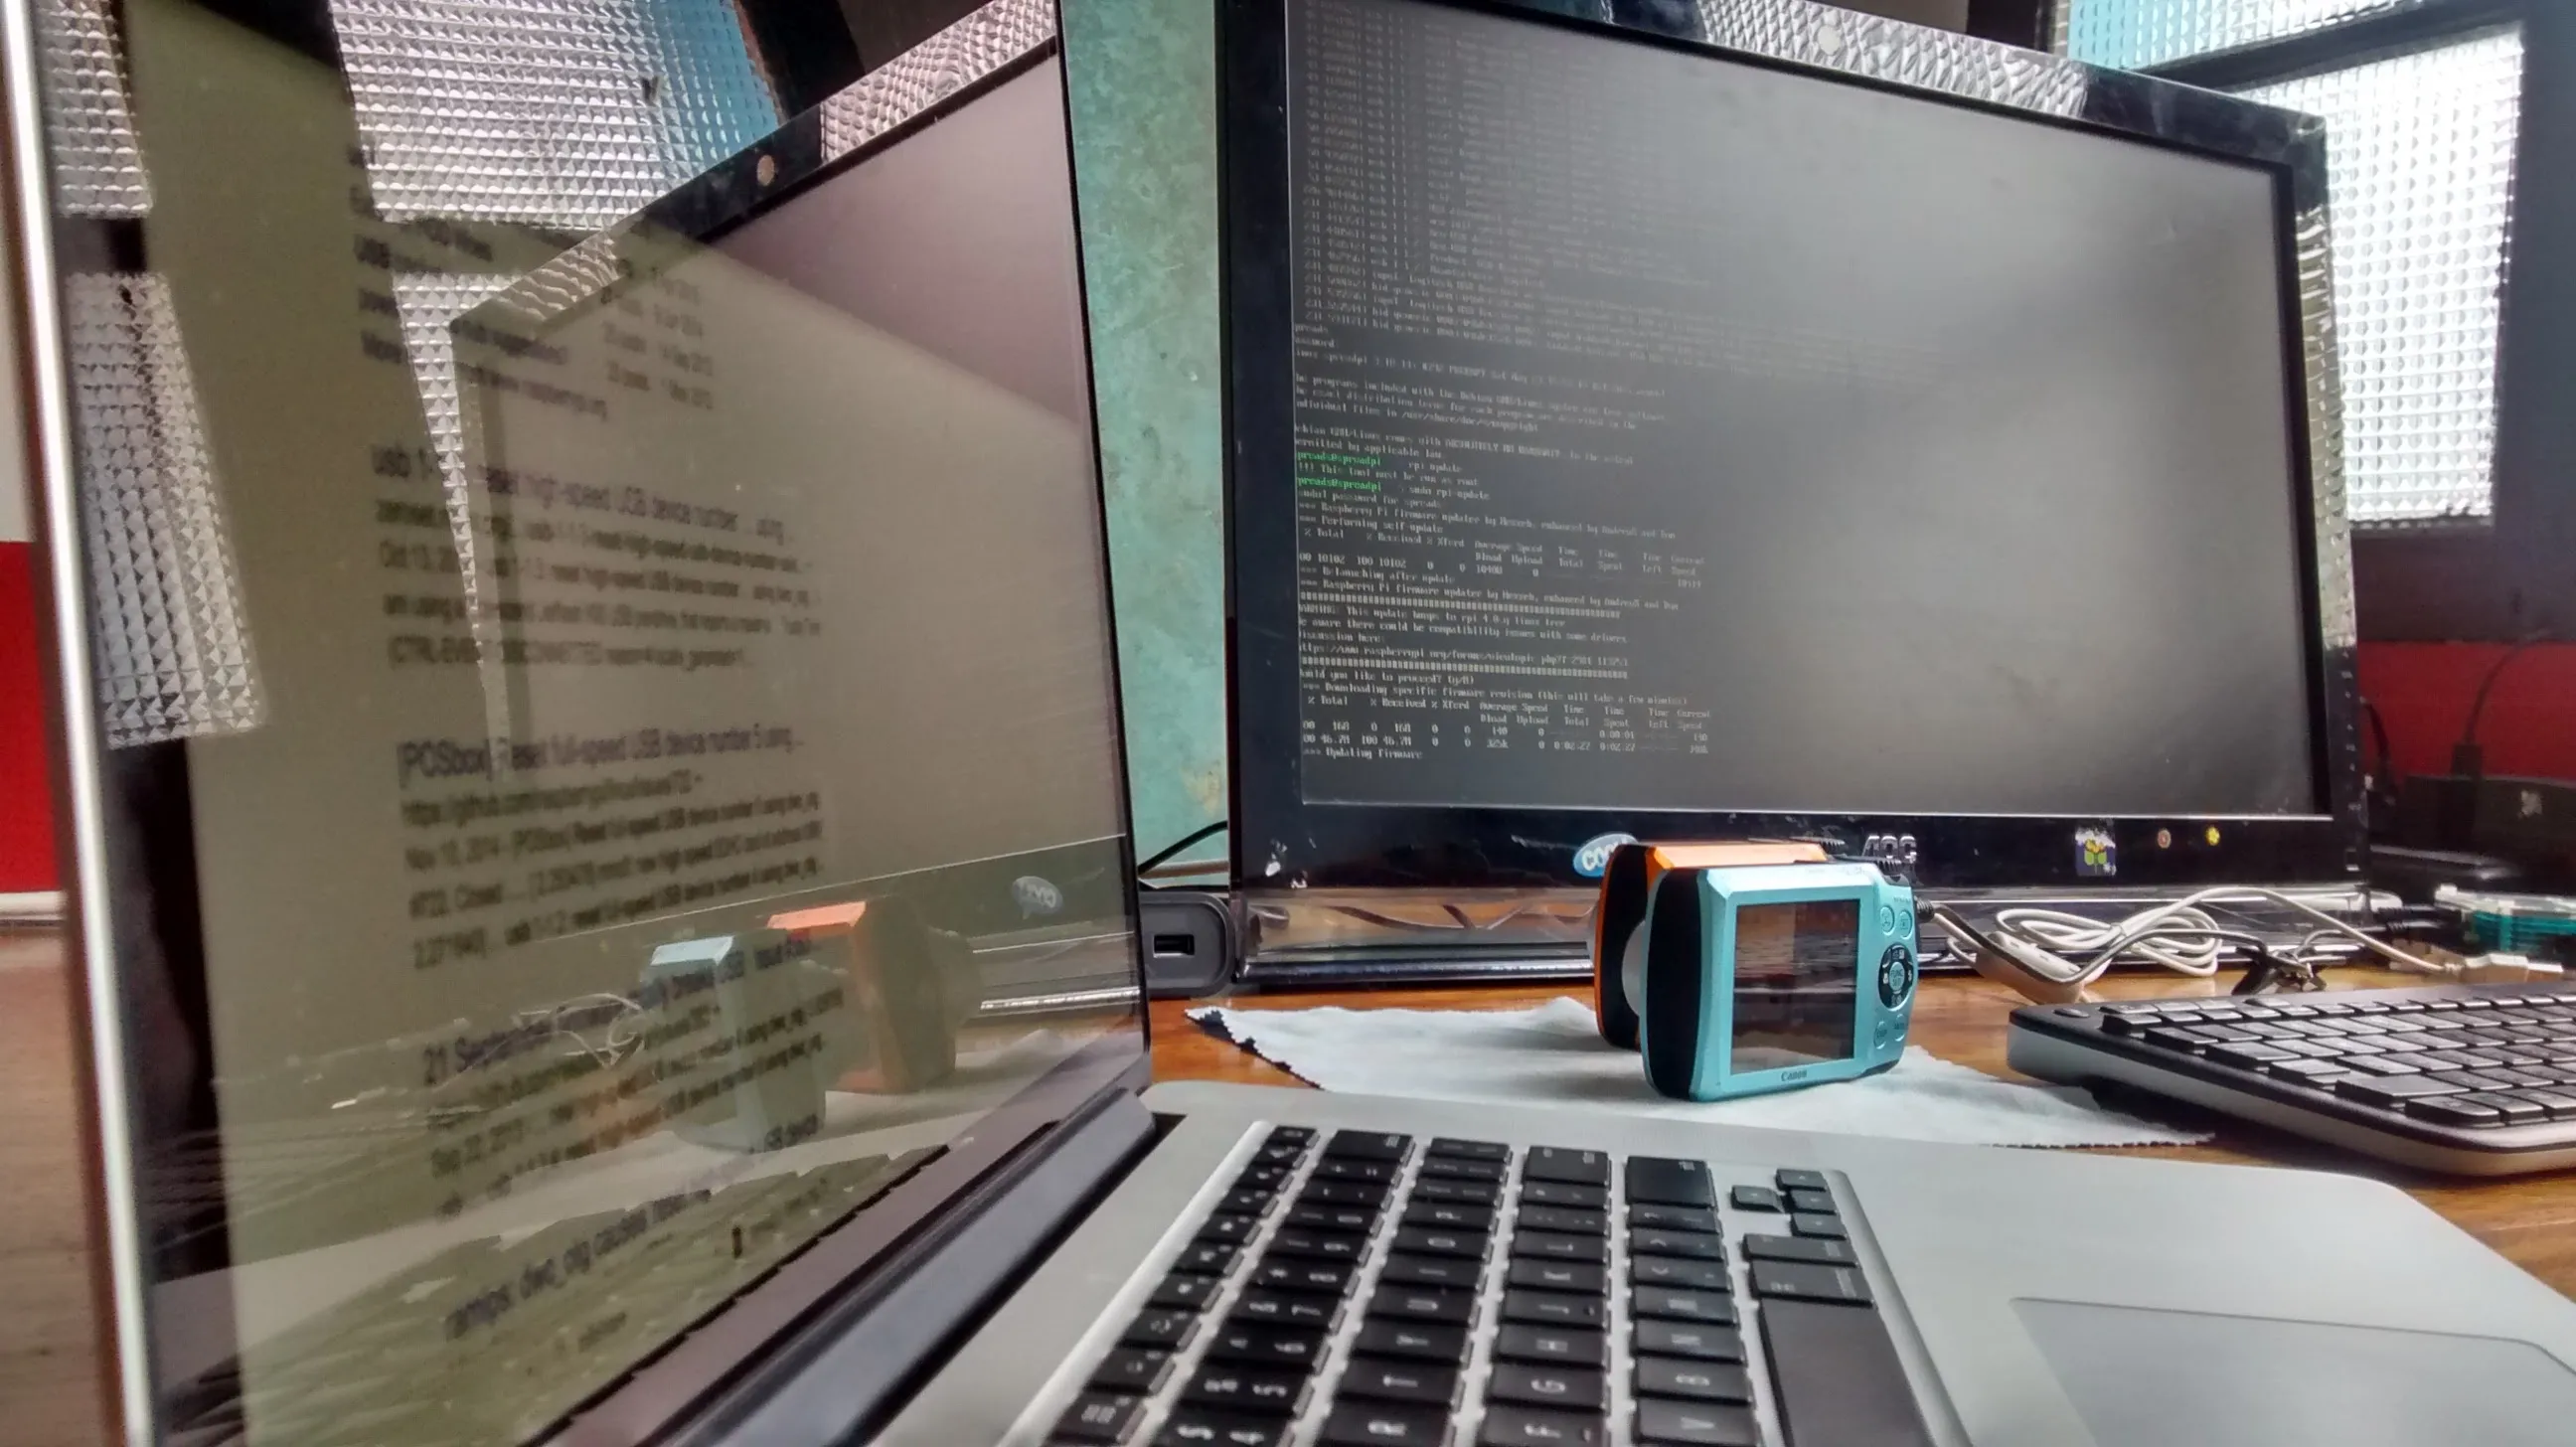
For the electronics, we worked with 2 Canon PowerShot cameras that were attached via l-brakcets to beams parallel to the plexiglass. This meant that the cameras were always in the same centered location, aiming towards the book. Each camera would take a picture of the page opposite to it and save it to the computer via USB. Unfortunately the cables did not provide energy and batteries had to be often replaced. A PC was placed on a side table next to the scanner and had the cameras connected to it.
Finally, for lightning a strong light was attached to the central beam, this provided light at the proper angle to not cast a glare on the cameras. One thing we had not accounted for at the beginning was how other sources of light could affect the results. This included ambient light as well as reflection light from the wooden beams. We'd resolve this by painting the support beams with black matte paint and ensuring the scanning was done in an area with little to no light.
Software
There are two parts to the software, an interface was needed in the computer to be able to interact with the cameras, and the cameras needed to be hacked customized in order to be able to interact with them. This was achieved with CHDK a fantastic tool for anyone looking to do a little more with their Canon, whether it's a simple point and shoot or a DSLR.
I had initially intended for the application to run in a RaspberryPi, it had all the aspects needed for it. Unfortunately I had trouble getting the application to run as needed. This led us to stick to chdkptp, an open source application developed by the team behind CHDK. This application was configured to work with our setup and folder structure. Part of the customization involved ensuring that the cameras always had the same configuration, including ISO, aperture, speed, and zoom level. Because we knew there would be differences in depth depending on the thickness of the books, we had to lower the aperture as much as the light would allow. This gave us focused images even at different depth variations. The application then allowed us to take photos of the two cameras simultaneously and automatically save them to a chosen location. Furthermore the application was designed to work "in sessions" where once started a session, a single button click was all that was required for the next scan. This created a very fluent process of scan, turn page, repeat.
The Scanning Process
Once the pages had been scanned, basic sorting and naming was required to make sure we'd be able to find the samples when needed. For safety, the samples were coppied to two external drives after each session, ensuring we had two copies at all times.
As you may imagine the process of scanning them wasn't particularly glamorous nor exciting (scan, turn page, repeat). We did what we could to smooth out the workflow and make it as easy as possible but, when it came to it, it was something comparable to Sisyphus' quest. Luckily, at this point we had received support from benefactors that was used to hire help to give us a hand.
The Results
Once all the books were scanned, we were left with ~400GB of data. Mind you, these were not the original RAW images but high quality, yet smaller, exported versions. Otherwise I don't think we would've had the sufficient storage. The samples were stored in folders broken down by years/months/days.
Some samples needed to be re-scanned while some could not be savaged due to the level of deterioration. But we were pleased to say that the great majority of the newspaper history could be considered safely preserved.
How it would be presented to the world... That's another story to come soon.
Final Notes
This post was written and published on July 16, 2022. That's 7 years after the original work. Back then I had my doubts about leaving the US and being back in Peru... Now, looking back, I can't imagine not having been there and then; for my family, for their legacy, and for the thrill of a puzzle such as this. Thank you to all who were part of this amazing collaboration. That rock would have not rolled itself up.